This page explains how to set up Microsoft Outlook 2007 to send and receive e-mail for a POP mailbox you've created.
Tip: make sure that the program you are using is Microsoft Outlook, and not Microsoft Outlook Express. These two similarly named programs have different set up instructions. Be sure you do not see the word "Express" on the screen when you start the program.
1. Start the Microsoft Outlook program.
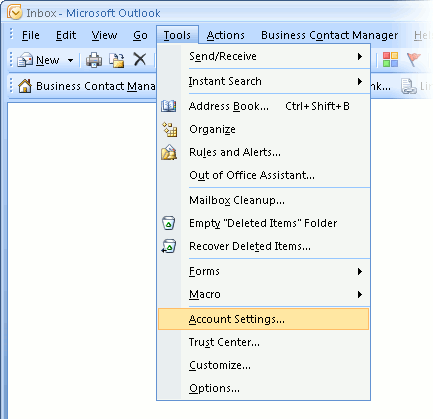
You can use the Start menu to start Outlook 2007. When it opens, click Tools, then Accounts Settings from the menu bar:
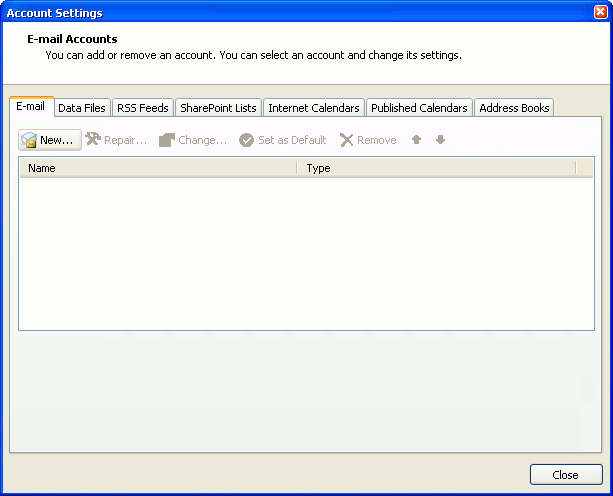
2. The "Accounts Settings" window appears.
Make sure the E-mail tab is selected, then click New.
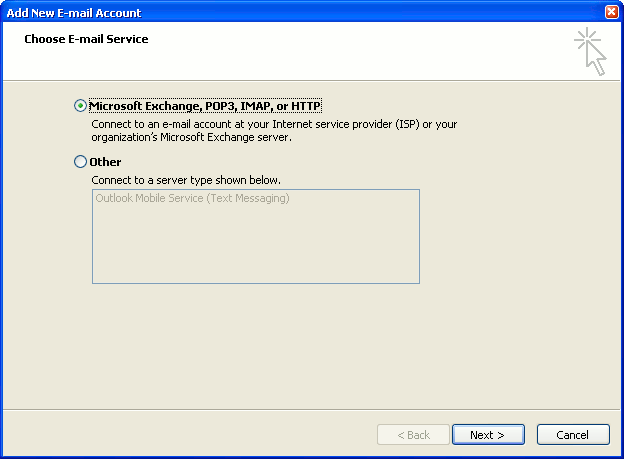
3. You are asked to choose the E-mail Service.
Choose Microsoft Exchange, POP3, IMAP or HTTP, then click Next.
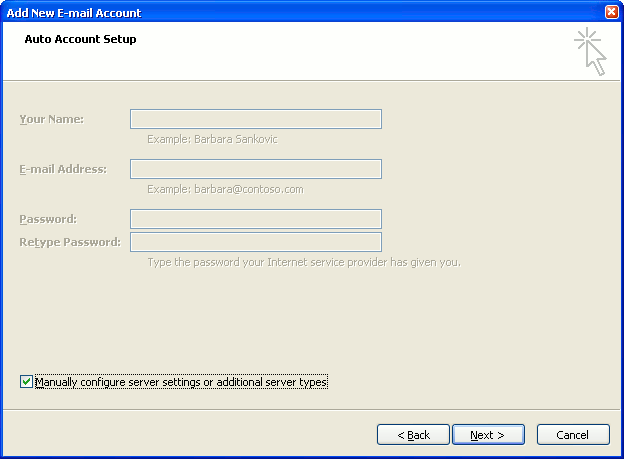
4. The "Auto Account Setup" screen appears.
When this window appears, simply leave the fields empty, check the Manually configure server settings or additional server types checkbox, then click Next.
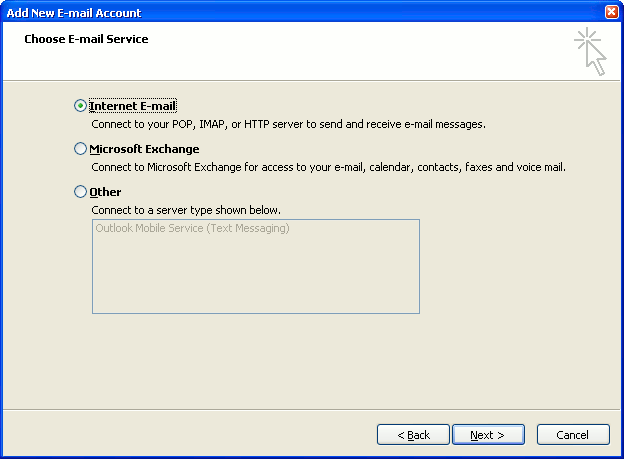
5. The "Choose E-mail Service" screen appears.
Choose Internet E-mail, then click Next.
6. The "Internet E-mail Settings" screen appears.
This is the window where you'll enter most of your account settings. You want the window to look like this:
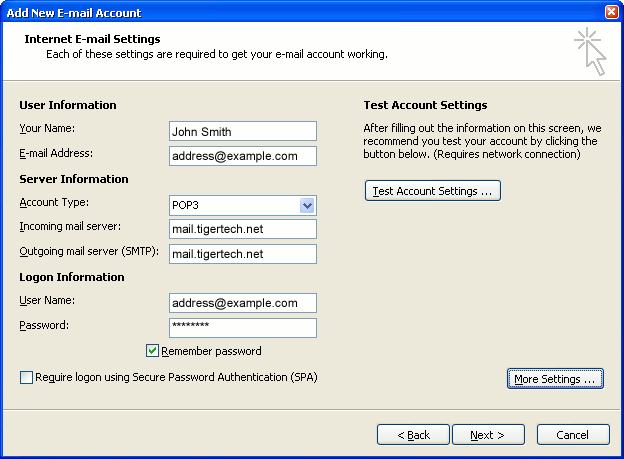
- "Your Name" is the name that other people will see when you send them e-mail. It should usually be your real name, such as John Smith or Joan of Arc.
- Enter your "E-mail Address". The address must be the e-mail address of the POP mailbox you created in your account management control panel.
- For "Account Type", choose POP3.
- Enter pop3.wildplanetmail.com for the "Incoming mail server" and smtp.wildplanetmail.com for the "Outgoing mail server (SMTP)".
- Enter your e-mail address again as the "User Name". (The user name must be all lower case).
- Type your e-mail password into the "Password" box. This is the password you chose for this e-mail address when you created the mailbox in your account management control panel. Or, we may have created it for you. Remember that this password may be different from your master account password. Make sure you check Remember password if you don't want Outlook to ask you for the password each time you read e-mail.
- Make sure that "Require logon using Secure Password Authentication (SPA)" is not checked.
- Do not click "Test Account Settings" yet; it will not work until you complete the next steps.
7. Click the "More Settings" button.
A new "Internet E-mail Settings" window appears.
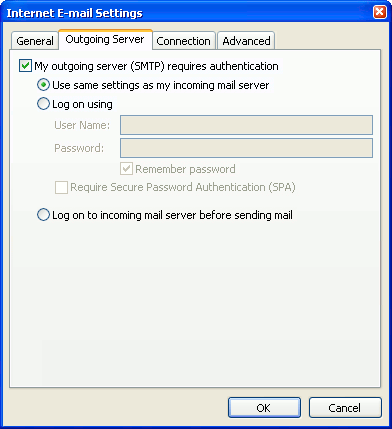
8. Choose the "Outgoing Server" tab.
In the "Outgoing Server" tab, check My outgoing server (SMTP) requires authentication.
Select Use same settings as my incoming mail server.
9. Choose the "Advanced" tab.
Click the "Advanced" tab and change the "Outgoing Server (SMTP)" port number to 587. Doing this makes sure that your ISP will not block your outgoing mail connections.
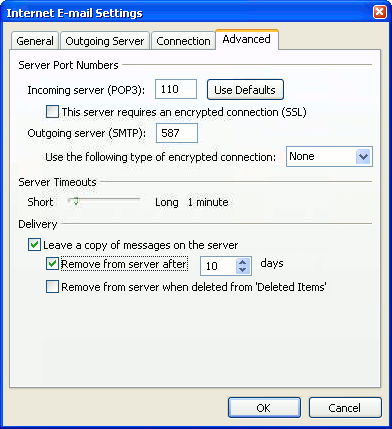
In this picture, we've also shown the "Leave a copy of messages on the server" option checked. Whether you do this (and what options you choose below it) is up to you, but we do recommend it: it makes Outlook leave messages on our server so they're visible to your Webmail pages, and to any other devices you might use to read mail. If you don't enable this option, your computer running Outlook will contain the only copies of your messages.
10. Click OK to close the "Internet E-mail Settings" window.
After you close the "Internet E-mail Settings" window, the "Add New E-mail Account" screen will still be visible.
11. Test the settings.
Click Test Account Settings. Outlook will usually tell you that "all tests completed successfully".
If Outlook tells you a test failed, double-check to be sure you've entered the settings correctly.
If Outlook still tells you that a test failed, we recommend continuing anyway. This is because some software on your computer (including Norton Antivirus) can make the "Test Account Settings" feature fail, even when Outlook is correctly configured. In most cases, Outlook will work properly when you try sending real messages.
If the "Test Account Settings" window is still open, close it to continue.
12. Finish the wizard.
Click Next, then Finish.
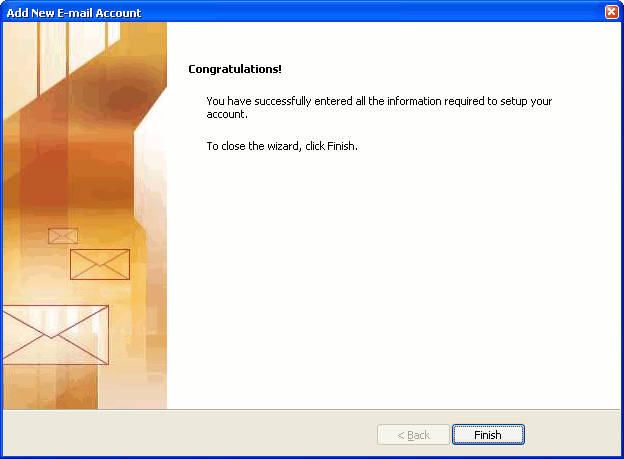
Outlook setup is complete
You're finished! Try sending yourself a test e-mail message to make sure it works.


I intended to compose you a bit of remark to be able to give many thanks as before on the beautiful tricks you've discussed on this page. This has been quite wonderfully open-handed with you to give unreservedly just what some people might have offered for sale for an e book to get some bucks on their own, most importantly considering the fact that you might well have tried it in case you considered necessary. Those concepts likewise served to be a easy way to understand that some people have a similar desire the same as my own to figure out great deal more when it comes to this condition. I am certain there are some more fun opportunities in the future for many who view your blog.