Blog

Super User

Super User

Lorem ipsum dolor sit amet, consectetur adipiscing elit, sed do eiusmod tempor incididunt ut labore et dolore magna aliqua. Ut enim ad minim veniam, quis nostrud exercitation ullamco laboris nisi ut aliquip ex ea commodo consequat. Duis aute irure dolor in reprehenderit in voluptate velit esse cillum dolore eu fugiat nulla pariatur.

This page explains how to set up Microsoft Outlook 98 or Outlook 2000 to send and receive e-mail for a POP mailbox that you've created. (The screen shots below are from Outlook 2000, although Outlook 98 is similar.)

Tip: make sure that the program you are using is Microsoft Outlook, and not Microsoft Outlook Express. These two similarly named programs have different set up instructions. Be sure you do not see the word "Express" on the screen when you start the program.

1. Start the Microsoft Outlook program.

You can use the Start menu to start Outlook. When it opens, click Tools, then Accounts from the menu bar:

outlook98 1

2. The "Internet Accounts" window appears.

On the right-hand side, click Add, then Mail.

outlook98 2

3. The "Internet Connection Wizard" window appears.

The wizard first asks for your name. This is the name that other people will see when you send them e-mail. It should usually be your real name, such as John Smith or Joan of Arc.

Type the name you want other people to see when you send them e-mail, then click Next.

outlook98 3

4. The wizard asks for your Internet E-mail Address.

Enter your e-mail address, then click Next. The address must be the e-mail address of the POP mailbox you created in your account management control panel.

outlook98 4

5. The wizard asks for your E-mail Server Names.

Leave the server type as POP3. Type mail.tigertech.net as the name of both your incoming and outgoing server, then click Next.

outlook98 5

6. The wizard asks for your Internet Mail Logon.

The "Internet mail Logon" is your e-mail username and password.

  • Type your e-mail address as your account name (it must be all lowercase).
  • Type your e-mail password, which is the password you chose for this e-mail address when you created the mailbox in your account management control panel. Or, we may have created it for you. Remember that this password may be different from your master account password.
  • If you wish, check the Remember password box to have Outlook remember your password so that you don't have to type it each time you send or receive e-mail.

The window should look like this:

outlook98 6

Click Next when finished.

7. Microsoft Outlook asks for a method of connecting to the Internet.

Usually you will already have a connection to the Internet. In these cases you can choose I will establish my Internet connection manually.

Click Next when you have selected the appropriate option.

outlook98 7

8. The wizard tells you that you've entered all the information.

Click Finish.

outlook98 8

While the wizard has collected the basic information needed to receive e-mail, one other change is needed to make sure that you can send mail. Continue with the steps below to finish setting up Microsoft Outlook.

9. Continue with Outlook setup.

The "Internet Accounts" window should still be open. Highlight the new e-mail account and click Properties.

outlook98 9

10. The "Properties" window appears.

Click the Servers tab and check My server requires authentication (at the bottom of the window). You don't need to click Settings; the default settings are fine. Also, note that you should not check Log On Using Secure Password Authentication.

outlook98 10

11. Change the SMTP port number.

Changing the SMTP port number ensures that your ISP will not block outgoing mail connections to our mail servers.

  • Click the Advanced tab.
  • Change the Outgoing mail (SMTP) port number from 25 to 587.
outlook98 11

12. Close the setup windows.

Click OK to close the Properties window, then click Close to close the Internet Accounts window.

The setup is complete.

You're finished! Try sending yourself a test e-mail message to make sure it works.

The following tutorial will show you how set up your email accounts in the default Apple email client, Mac Mail. If you have any questions regarding this set up, please feel free to contact support and we can assist you further.


1screen


Step 1: When you initially open MacMail, you will be presented with a screen similar to the one above. Fill out the requested information. Once you have done this, click Continue.


pop2screen


In this next screen you put in the information regarding how MacMail will receive email. For account type select either POP or IMAP (If you would like to know the differences between POP and IMAP please consult: Getting Started Guide: Email). For “Description”, you can enter anything you would like so you know what account this is (useful for if you have multiple accounts). For “Incoming Mail Server” the server name will be mail.yourdomain.com. In the above example, the domain is imhtraining.com, the mail server is mail.imhtraining.com. In the “User Name” field put your Full Email Address. Just putting the part before the “@” will cause the server to not be able to authenticate correctly. In the password field put the password for the email account.

Please note, MacMail by default uses SSL. As a result when you use mail.yourdomain.com with IMAP there will be a warning asking you if you want to trust and accept an SSL certificate. It is perfectly safe to click allow for this. If you would like for this message to not appear and are in a shared environment change the mail server to securexx.inmotionhosting.com, where xx is your server number. For example, if your Welcome Email states that your account is on biz54.inmotionhosting.com, your outgoing server name should be secure54.inmotionhosting.com. If you are unsure, please contact support.


smtp4screen


Step 3: Much like the earlier screen for the Incoming Mail Server, we must now set the sending settings. Fill out the “Description” field as you see fit. The “Outgoing Mail Server” field should be filled out with the same server that was used in the “Incoming Mail Server” field. Check the box that says “Use only this server”. Also check the box that says “Use Authentication” and fill in the “User Name” field with your Full Email Address and “Password” with that account's password.

Again note, MacMail by default uses SSL. As a result when you use mail.yourdomain.com with IMAP there will be a warning asking you if you want to trust and accept an SSL certificate. It is perfectly safe to click allow for this. If you would like for this message to not appear and are in a shared environment change the mail server to securexx.inmotionhosting.com, where xx is your server number. For example, if your Welcome Email states that your account is on biz54.inmotionhosting.com, your outgoing server name should be secure54.inmotionhosting.com. If you are unsure, please contact support.

Once you ready, click Continue.


imapfinal


Step 4: Once you complete setting up the account you will be presented with an Account Summary screen. Click the box that says “Take account online” if it isn't already checked. If all the information looks correct go ahead and hit create. You will now be able to use your account in MacMail.


This article will guide you how to setup POP3 email account from iPhone/iPod Touch.

1. If this is the first account you’re setting up on the iPhone/iPod Touch, tap Mail. Otherwise, from the Home screen tap Settings -> Mail -> Accounts -> Add Account.

2. Choose your email account type. For setting up email to work with your domain email address tap Other.

3.Enter your Name , Address(email address), Email Password , and the description.


4.Tap SAVE POP or IMAP will be show on top on bar. You are allow to choose POP3 or IMAP when setup domain email into iPhone/iPod Touch.


5.tap POP so it will highlighted.

6.Fill in all as below POP Info Name: Email name , Address (full email address), and Description.
Incoming Mail server : host name: mail.yourdomain.com, Username: (full email address), Password (email password) -> click done/verify.


7. If system showing message as Cannot verify server indentity, tap Details and tap Accept.


8. After accept, go back HOME go to -> Settings -> Mail, Contacts, Calendars -> Tap (email account you setup earlier) and check POP and SMTP (outgoing mail server) setting.


9. tap SMTP mail.yourdomain.com > tap mail.yourdomain.com On, (yourdomain.com represent your domain name).


10.Check your SMTP SSL: off (enable it if your webmail come with SSL) , Authentication: Password, Server Port number : 587 (if you choose SSL you will need to set Server Port as 465 for SMTP) Once confirm tap DONE.


11.Go back to email setting page , click advance to check your POP setting, SSL: off, Authentication: Password , Server Port : 110, if you enable SSL you are require set it as : 995.


12.tap Done/Verify, Your iphone/iPod Touch is now configure to send and receive your domain email.

If you've just started using Wild Planet as your email service provider, there are a few configuration changes you will need to make in your Microsoft Outlook before you can begin sending and receiving mail. Up to now, your Outlook has been configured to log into your previous email servers, but now you must give it the instructions it needs to log into ours.

There are quite a few versions of Microsoft Outlook, but the settings are the same for all of them. The only thing that is different is how you get to the Account Settings area. Below you will find instructions for Outlook 2010; we are currently working on instructions for Outlook 2000, 2003, 2007, and 2013.


1. Start the Microsoft Outlook program.

Use the Start menu to start Outlook 2010. If you’ve never used Outlook before, it will prompt you to create a new account. In that case, skip ahead to step 2. If you’ve previously used Outlook and it doesn’t prompt you, click the File tab, then the Add Account button (see image below).

Or, if you have been using Outlook previously and simply need to reconfigure it in order to use our email servers, then look for your existing account in the Account Settings window, and then click the CHANGE button. (because you will be CHANGING existing account settings). Skip to Step 4 below.

outlook2010 1

2. The “Auto Account Setup” screen appears.

When this window appears, leave the spaces empty, choose the Manually configure server settings or additional server types option, then click Next.

outlook2010 2

3. The “Choose Service” screen appears.

Choose Internet E-mail, then click Next.

Outlook 2010

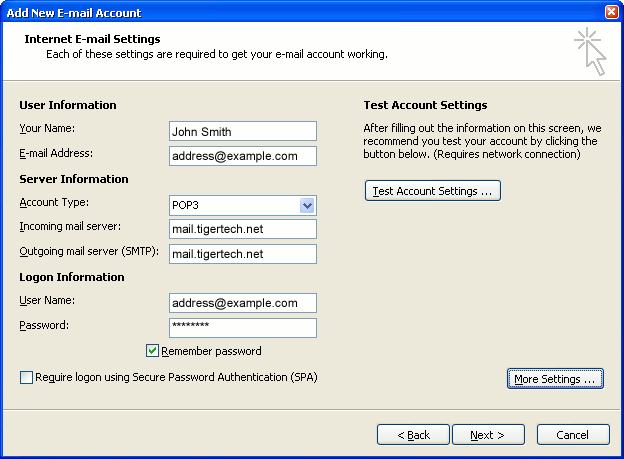
4. The “Internet E-mail Settings” screen appears.

This is the window where you’ll enter most of your account settings. You want the window to look like this:

Outlook 2010
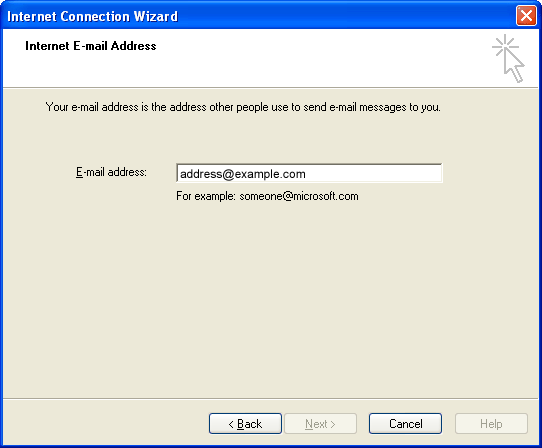
  • “Your Name” is the name that other people will see when you send them e-mail. It should usually be your real name, such as Bill Gates or Joan of Arc.
  • Enter your “E-mail Address”. The address must be the e-mail address of the mailbox you created in your account management control panel.
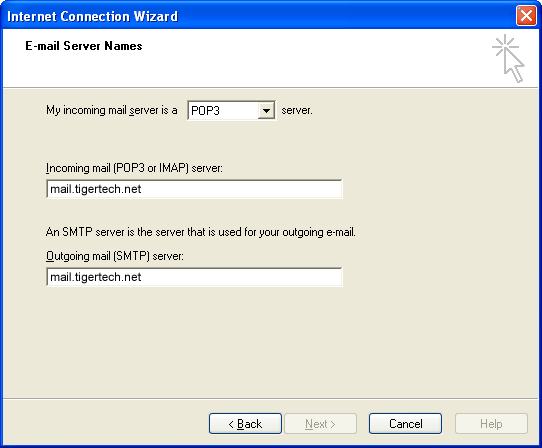
  • For “Account Type”, choose POP3.
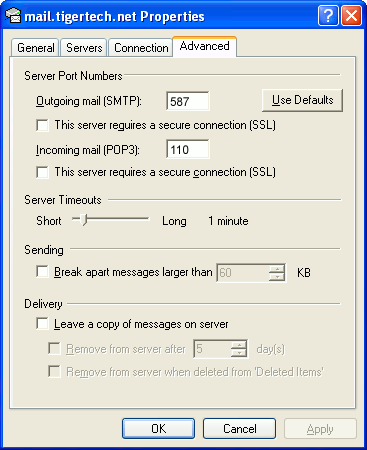
  • Enter pop3.wildplanetmail.com for the “Incoming mail server” and smtp.wildplanetmail.com for the “Outgoing mail server (SMTP)”.
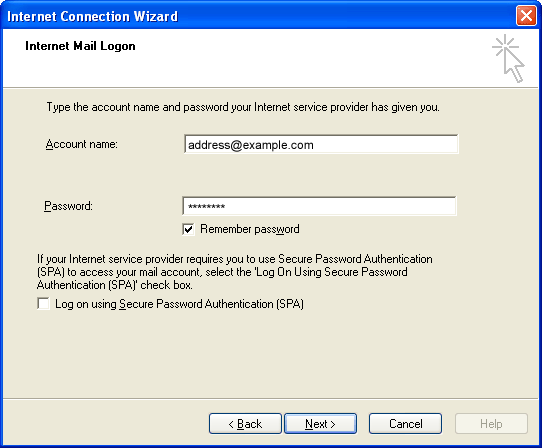
  • Enter your (full) e-mail address again as the “User Name”. (The user name must be all lowercase).
  • Type your e-mail password into the “Password” box. This is the password you chose for this e-mail address when you created the mailbox in your account management control pane (unless we have created it for you). This password may be different from your master “My Account” password with our company.
  • Make sure that “Require logon using Secure Password Authentication (SPA)” is not checked.
  • Do not click “Test Account Settings” or “Next” yet; they will not work until you complete the next steps.

5. View “More Settings”.

Click the More Settings button. A new “Internet E-mail Settings” window appears.

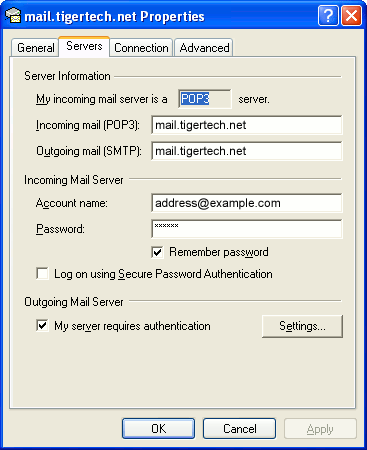
6. Choose the “Outgoing Server” tab.

In the “Outgoing Server” tab, check My outgoing server (SMTP) requires authentication and make sure Use same settings as my incoming mail server is selected:

Outlook 2010 outgoing authentication


7. Close the “Internet E-mail Settings” window.

Click OK to close the “Internet E-mail Settings” window. The “Add New Account” screen will still be visible.

8. Test the settings.

Click Next. Outlook will test the settings, then should tell you that “all tests completed successfully”:

outlook2010 10

If Outlook tells you a test failed, double-check to be sure you’ve entered the settings correctly.

9. Finish the wizard.

If the “Test Account Settings” window is still open, click Close to continue.

Click Finish to finish the wizard.

Outlook setup is complete

You’re finished! Try sending yourself a test e-mail message to make sure it works.

This page explains how to set up Microsoft Outlook 2007 to send and receive e-mail for a POP mailbox you've created.

Tip: make sure that the program you are using is Microsoft Outlook, and not Microsoft Outlook Express. These two similarly named programs have different set up instructions. Be sure you do not see the word "Express" on the screen when you start the program.

1. Start the Microsoft Outlook program.

You can use the Start menu to start Outlook 2007. When it opens, click Tools, then Accounts Settings from the menu bar:

outlook2007 1

2. The "Accounts Settings" window appears.

Make sure the E-mail tab is selected, then click New.

outlook2007 2

3. You are asked to choose the E-mail Service.

Choose Microsoft Exchange, POP3, IMAP or HTTP, then click Next.

outlook2007 3

4. The "Auto Account Setup" screen appears.

When this window appears, simply leave the fields empty, check the Manually configure server settings or additional server types checkbox, then click Next.

outlook2007 4

5. The "Choose E-mail Service" screen appears.

Choose Internet E-mail, then click Next.

outlook2007 5

6. The "Internet E-mail Settings" screen appears.

This is the window where you'll enter most of your account settings. You want the window to look like this:

outlook2007 6
  • "Your Name" is the name that other people will see when you send them e-mail. It should usually be your real name, such as John Smith or Joan of Arc.
  • Enter your "E-mail Address". The address must be the e-mail address of the POP mailbox you created in your account management control panel.
  • For "Account Type", choose POP3.
  • Enter pop3.wildplanetmail.com for the "Incoming mail server" and smtp.wildplanetmail.com for the "Outgoing mail server (SMTP)".
  • Enter your e-mail address again as the "User Name". (The user name must be all lower case).
  • Type your e-mail password into the "Password" box. This is the password you chose for this e-mail address when you created the mailbox in your account management control panel. Or, we may have created it for you. Remember that this password may be different from your master account password. Make sure you check Remember password if you don't want Outlook to ask you for the password each time you read e-mail.
  • Make sure that "Require logon using Secure Password Authentication (SPA)" is not checked.
  • Do not click "Test Account Settings" yet; it will not work until you complete the next steps.

7. Click the "More Settings" button.

A new "Internet E-mail Settings" window appears.

8. Choose the "Outgoing Server" tab.

In the "Outgoing Server" tab, check My outgoing server (SMTP) requires authentication.

Select Use same settings as my incoming mail server.

outlook2007 8

9. Choose the "Advanced" tab.

Click the "Advanced" tab and change the "Outgoing Server (SMTP)" port number to 587. Doing this makes sure that your ISP will not block your outgoing mail connections.

outlook2007 10

In this picture, we've also shown the "Leave a copy of messages on the server" option checked. Whether you do this (and what options you choose below it) is up to you, but we do recommend it: it makes Outlook leave messages on our server so they're visible to your Webmail pages, and to any other devices you might use to read mail. If you don't enable this option, your computer running Outlook will contain the only copies of your messages.

10. Click OK to close the "Internet E-mail Settings" window.

After you close the "Internet E-mail Settings" window, the "Add New E-mail Account" screen will still be visible.

11. Test the settings.

Click Test Account Settings. Outlook will usually tell you that "all tests completed successfully".

If Outlook tells you a test failed, double-check to be sure you've entered the settings correctly.

If Outlook still tells you that a test failed, we recommend continuing anyway. This is because some software on your computer (including Norton Antivirus) can make the "Test Account Settings" feature fail, even when Outlook is correctly configured. In most cases, Outlook will work properly when you try sending real messages.

If the "Test Account Settings" window is still open, close it to continue.

12. Finish the wizard.

Click Next, then Finish.

outlook2007 finish

Outlook setup is complete

You're finished! Try sending yourself a test e-mail message to make sure it works.

If your website was built several years ago, it may already be technologically out of date. It was most likely developed using the top technology of the time. However, in just the past 18 months or so, there has been some tremendous developments in web technologies...

Flickr Stream