If you've just started using Wild Planet as your email service provider, there are a few configuration changes you will need to make in your Microsoft Outlook before you can begin sending and receiving mail. Up to now, your Outlook has been configured to log into your previous email servers, but now you must give it the instructions it needs to log into ours.
There are quite a few versions of Microsoft Outlook, but the settings are the same for all of them. The only thing that is different is how you get to the Account Settings area. Below you will find instructions for Outlook 2010; we are currently working on instructions for Outlook 2000, 2003, 2007, and 2013.
1. Start the Microsoft Outlook program.
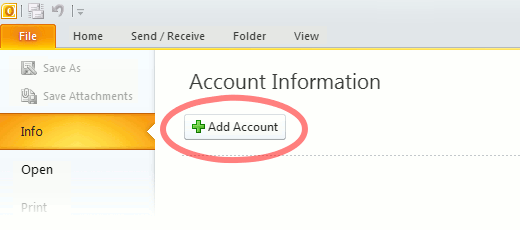
Use the Start menu to start Outlook 2010. If you’ve never used Outlook before, it will prompt you to create a new account. In that case, skip ahead to step 2. If you’ve previously used Outlook and it doesn’t prompt you, click the File tab, then the Add Account button (see image below).
Or, if you have been using Outlook previously and simply need to reconfigure it in order to use our email servers, then look for your existing account in the Account Settings window, and then click the CHANGE button. (because you will be CHANGING existing account settings). Skip to Step 4 below.
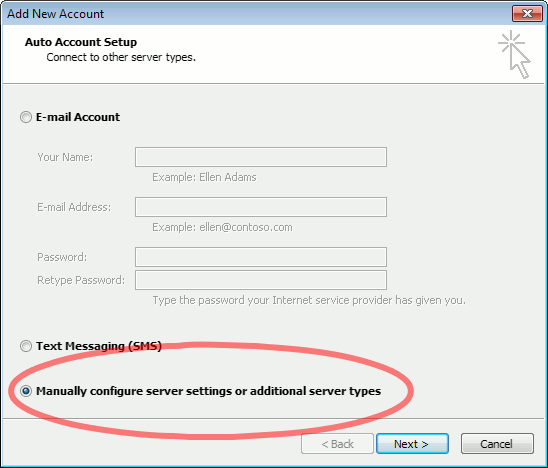
2. The “Auto Account Setup” screen appears.
When this window appears, leave the spaces empty, choose the Manually configure server settings or additional server types option, then click Next.
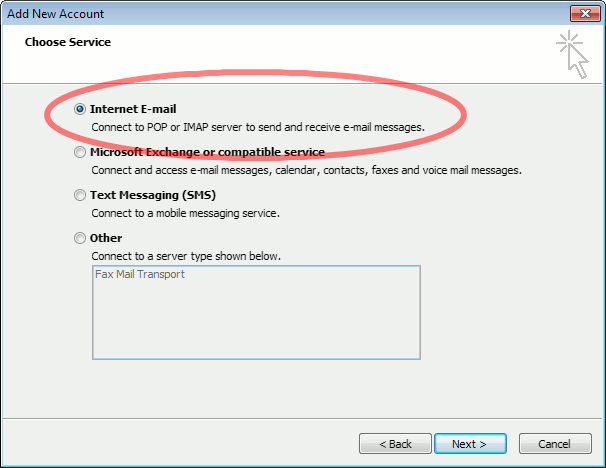
3. The “Choose Service” screen appears.
Choose Internet E-mail, then click Next.
4. The “Internet E-mail Settings” screen appears.
This is the window where you’ll enter most of your account settings. You want the window to look like this:
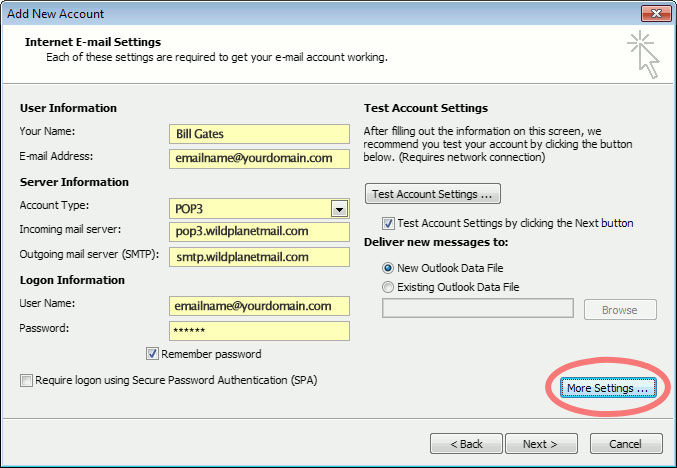
- “Your Name” is the name that other people will see when you send them e-mail. It should usually be your real name, such as Bill Gates or Joan of Arc.
- Enter your “E-mail Address”. The address must be the e-mail address of the mailbox you created in your account management control panel.
- For “Account Type”, choose POP3.
- Enter pop3.wildplanetmail.com for the “Incoming mail server” and smtp.wildplanetmail.com for the “Outgoing mail server (SMTP)”.
- Enter your (full) e-mail address again as the “User Name”. (The user name must be all lowercase).
- Type your e-mail password into the “Password” box. This is the password you chose for this e-mail address when you created the mailbox in your account management control pane (unless we have created it for you). This password may be different from your master “My Account” password with our company.
- Make sure that “Require logon using Secure Password Authentication (SPA)” is not checked.
- Do not click “Test Account Settings” or “Next” yet; they will not work until you complete the next steps.
5. View “More Settings”.
Click the More Settings button. A new “Internet E-mail Settings” window appears.
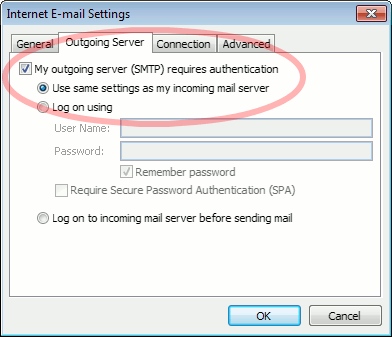
6. Choose the “Outgoing Server” tab.
In the “Outgoing Server” tab, check My outgoing server (SMTP) requires authentication and make sure Use same settings as my incoming mail server is selected:
7. Close the “Internet E-mail Settings” window.
Click OK to close the “Internet E-mail Settings” window. The “Add New Account” screen will still be visible.
8. Test the settings.
Click Next. Outlook will test the settings, then should tell you that “all tests completed successfully”:
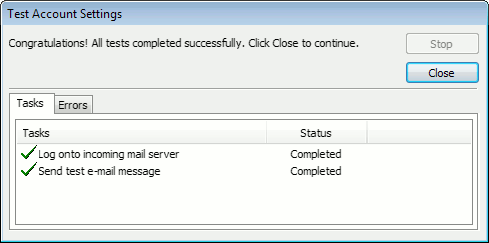
If Outlook tells you a test failed, double-check to be sure you’ve entered the settings correctly.
9. Finish the wizard.
If the “Test Account Settings” window is still open, click Close to continue.
Click Finish to finish the wizard.
Outlook setup is complete
You’re finished! Try sending yourself a test e-mail message to make sure it works.


This post is a masterpiece — not even exaggerating!